
Step by Step Menu Customization for Restaurants
- Abhi Bose
- Jun 14
- 8 min read


TL;DR:
Effective menu customization transforms restaurant layouts into personalized sales tools that boost revenue and guest satisfaction.
Using the right platform, accurate data, and ongoing optimization ensures menus adapt to customer preferences and operational changes over time.
Menu customization is the systematic process of tailoring your restaurant’s layout, content, and interactive features to match customer preferences and operational goals. Done right, step by step menu customization turns a flat list of dishes into a living sales tool that guides guests toward the right choices, increases average check size, and reduces friction at the point of order. Platforms like Mydigimenu, along with AI-driven personalization tools, have made this process accessible to operators of every size. This guide walks you through every stage, from initial setup through ongoing optimization.
What prerequisites and tools do you need first?
Strong menu customization starts with the right inputs. Before you touch a single layout setting, gather your complete item catalog, current pricing, allergen and dietary information, and any brand guidelines covering fonts and colors. These assets form the foundation of every decision you make downstream.
Digital menu platforms are the primary tool category here. Mydigimenu supports QR code menus, tablet menus, and mobile ordering with no app download required. It also integrates with third-party POS and CRM systems, which matters because POS and CRM integration keeps menu data accurate with real-time stock updates and personalized offers tied to loyalty data. Without that connection, your menu can display sold-out items or miss upsell opportunities.
Here is a quick comparison of the feature categories you should evaluate when selecting a platform:
Feature Category | What to Look For |
Layout editor | Drag-and-drop sections, category management, color and font controls |
Media support | High-resolution photo and video upload, dietary icons |
Personalization | AI-driven suggestions, customer history integration |
POS/CRM sync | Real-time inventory, loyalty data, order history |
Analytics | Item performance, average check, guest feedback |
Beyond the platform itself, you need three additional inputs before starting:
Customer preference data. Pull order history from your POS to identify top sellers, slow movers, and high-margin items.
Visual assets. Professional photos of your star dishes. You do not need images for every item, but you need them for the dishes you want to sell most.
Pricing and modifier rules. Know your upsell combinations, portion sizes, and any time-based pricing before you configure a single modifier.
Pro Tip: Audit your current menu before touching any platform settings. Remove items with low sales and low margins. A tighter menu customizes faster and performs better.
How do you execute the step-by-step customization process?
This is the core of any menu personalization guide: a structured sequence that moves from strategy through design to interactive features.
Step 1: Define your audience and menu purpose. A hotel restaurant serving business travelers needs a different layout than a casual taco bar. Identify your primary guest profile, peak service periods, and the top three actions you want guests to take on the menu.
Step 2: Organize items into logical categories. Group dishes by course, cuisine type, or daypart. Limit each category to 7–10 items where possible. Research on progressive disclosure in menus shows that displaying all items at once overwhelms guests, while structured categories guide them naturally.
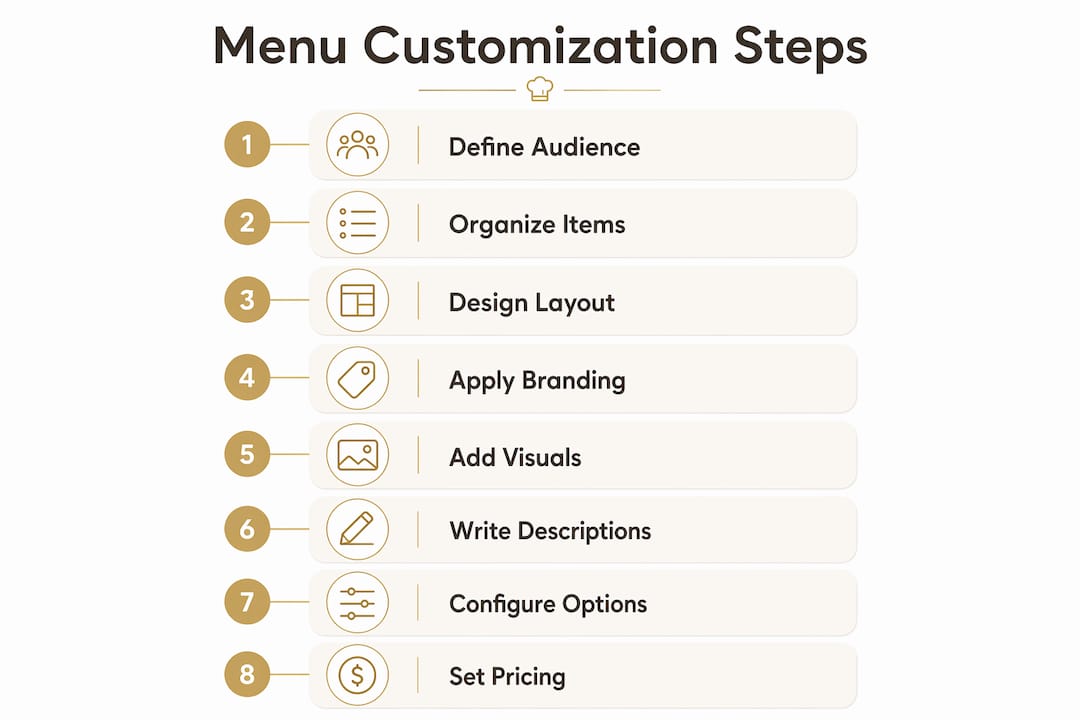
Step 3: Design the layout for readability. Place high-margin items in the top-right zone of each category section, since eye-tracking studies confirm guests scan menus in an F-pattern. Use white space generously. Crowded layouts reduce order confidence.
Step 4: Apply branding. Set your brand fonts, primary and accent colors, and logo placement. Consistency between your physical space and your digital menu builds trust. A guest who scans a QR code at your table should feel the same visual identity they saw on your signage.
Step 5: Add photos, icons, and dietary indicators. Focus detailed visuals on your highest-margin dishes. Over-visualizing every item slows interface performance and clutters the screen. Use dietary icons (vegan, gluten-free, spicy) consistently so guests can filter without reading every description.
Step 6: Write clear, appetizing item descriptions. Lead with the most distinctive ingredient or preparation method. “Slow-braised short rib with smoked bone marrow butter” outperforms “beef short rib with sauce” every time. Keep descriptions under 25 words.
Step 7: Configure modifiers and customization options. Set up toppings, sizes, and add-ons with photos for modifier options where possible. Visual cues reduce the need for staff assistance and increase modifier selection rates. Default your modifiers to the highest-margin combinations, but always allow guests to swap freely.
Step 8: Set pricing strategies and special offers. Apply time-based pricing for happy hour or lunch specials. Configure bundle offers and combo defaults that default to high-margin sides while keeping the swap option visible. This approach improves margins without making guests feel pressured.
Pro Tip: Add a persistent cart or order summary visible at all times. An always-visible cart significantly improves conversion rates by letting guests track their selections without navigating away from the menu.
What role does ai-driven personalization play today?
Dynamic personalization is the practice of adjusting menu content in real time based on customer history, time of day, weather, and behavioral signals. It goes beyond static layout choices and turns your menu into a responsive experience.
Restaurants that adopt AI-driven digital menus see profitability increases of 15%–30% over static menus. That gap exists because personalized menus surface the right items at the right moment, reducing decision fatigue and increasing average spend.
Key features of a well-built AI-driven menu include:
History-based recommendations. The system surfaces dishes a returning guest has ordered or items similar to past choices.
Context-aware adjustments. Menus adapt to weather, highlighting warm soups on cold days and refreshing drinks during heat waves.
Time-of-day filtering. Breakfast items disappear at noon. Late-night specials appear after 10 p.m. without manual intervention.
Upsell logic. The system suggests pairings based on what similar guests ordered together, not just what you manually configured.
One critical design rule applies here: always maintain a visible “full menu” or reset option. Balancing AI recommendations with full access prevents guests from feeling locked into a curated view and protects accessibility for guests with dietary restrictions the system has not yet learned.
Pro Tip: During the first 2–4 weeks after activating AI personalization, keep operator oversight active to enforce business rules before full automation takes over. This calibration period catches errors before they reach guests.
How do you maintain and optimize your menu over time?
Menu customization is not a one-time project. The phased implementation approach that yields the best results includes an ongoing optimization phase that never truly ends.
Schedule content reviews on a regular cycle. Update photos when dishes change presentation. Revise descriptions when ingredients shift seasonally. Adjust pricing when costs move. A menu that looked sharp at launch will feel stale within six months if left untouched.
Track these metrics consistently to know where to focus your updates:
Average check size by daypart and guest segment
Item click-through rate on digital menus to identify which dishes guests view but do not order
Modifier selection rate to gauge whether your upsell defaults are working
Guest feedback scores tied to specific menu sections
A/B testing is the most underused tool in menu optimization. Test two versions of a category layout, a description rewrite, or a photo swap across a defined period. Let the data decide, not intuition. Seasonal and occasion-based menus, such as a Valentine’s Day prix fixe or a summer cocktail feature, also give you natural testing windows with built-in guest interest.
Common mistakes that erode menu performance over time include overloading categories with too many items, using slow-loading images that frustrate mobile users, and ignoring the menu design principles that keep layouts readable as your item count grows.
Pro Tip: Use your digital platform’s analytics to identify your top five and bottom five items by revenue contribution every quarter. Promote the top five with better placement and visuals. Retire or reposition the bottom five before they drag down the overall experience.
Key takeaways
Effective menu customization requires a structured process, the right platform, and a commitment to continuous data-driven refinement rather than a single setup event.
Point | Details |
Start with a content audit | Gather item data, photos, allergen info, and pricing before touching any platform settings. |
Follow a structured eight-step process | Move from audience definition through layout, branding, visuals, descriptions, modifiers, and pricing in sequence. |
Use AI personalization with guardrails | AI-driven menus increase profitability 15%–30%, but always keep a full menu reset option accessible. |
Track performance metrics quarterly | Monitor average check size, item click-through, and modifier rates to identify where to update. |
Treat customization as ongoing | Schedule regular content reviews and A/B tests to keep the menu performing at its peak. |
Why most operators get menu customization backwards
Here is what I have observed working with restaurant operators across dozens of properties: most teams treat menu customization as a design project. They spend weeks on fonts and photos, then launch and walk away. Six months later, the menu looks the same as it did on day one, and the data they could have been collecting has gone unused.
The operators who see real results treat their menu as a living system. They set up their layout and branding once, then spend the majority of their ongoing effort on the data layer: what guests are clicking, what they are skipping, and what modifiers they are actually selecting. A mouthwatering photo of your signature dish matters. But knowing that 60% of guests who view that dish add the premium side when it is the default modifier matters more.
The other pattern I see consistently is fear of AI personalization. Operators worry that automated recommendations will alienate guests or surface the wrong items. That concern is valid during the calibration window, which is exactly why the 2–4 week oversight period exists. After that window, the system learns your business rules and your guest patterns simultaneously. The operators who skip the oversight phase and then complain about poor recommendations are the same ones who never gave the system the data it needed to learn.
My honest recommendation: start simpler than you think you need to, measure everything from day one, and add complexity only when the data tells you to. A clean eight-step menu with strong photos and smart modifier defaults will outperform an over-engineered AI menu that nobody on your team understands how to manage.
The future belongs to operators who combine creative presentation with disciplined data habits. That combination is not complicated. It just requires treating your menu as a product that ships new versions, not a printed card that gets laminated and forgotten.
— Abhi
Take your menu from static to extraordinary with Mydigimenu
Mydigimenu gives restaurant and hospitality professionals every tool covered in this guide, from drag-and-drop layout editing and high-quality food video support to POS integration, AI-driven personalization, and real-time analytics. The platform handles QR code menus, tablet and iPad menus, and mobile ordering without requiring guests to download an app. You can explore flexible pricing plans designed for single locations and multi-property groups alike. A dash of digital can turn everyday service into extraordinary memories, and Mydigimenu is built to make that transformation practical, not theoretical.
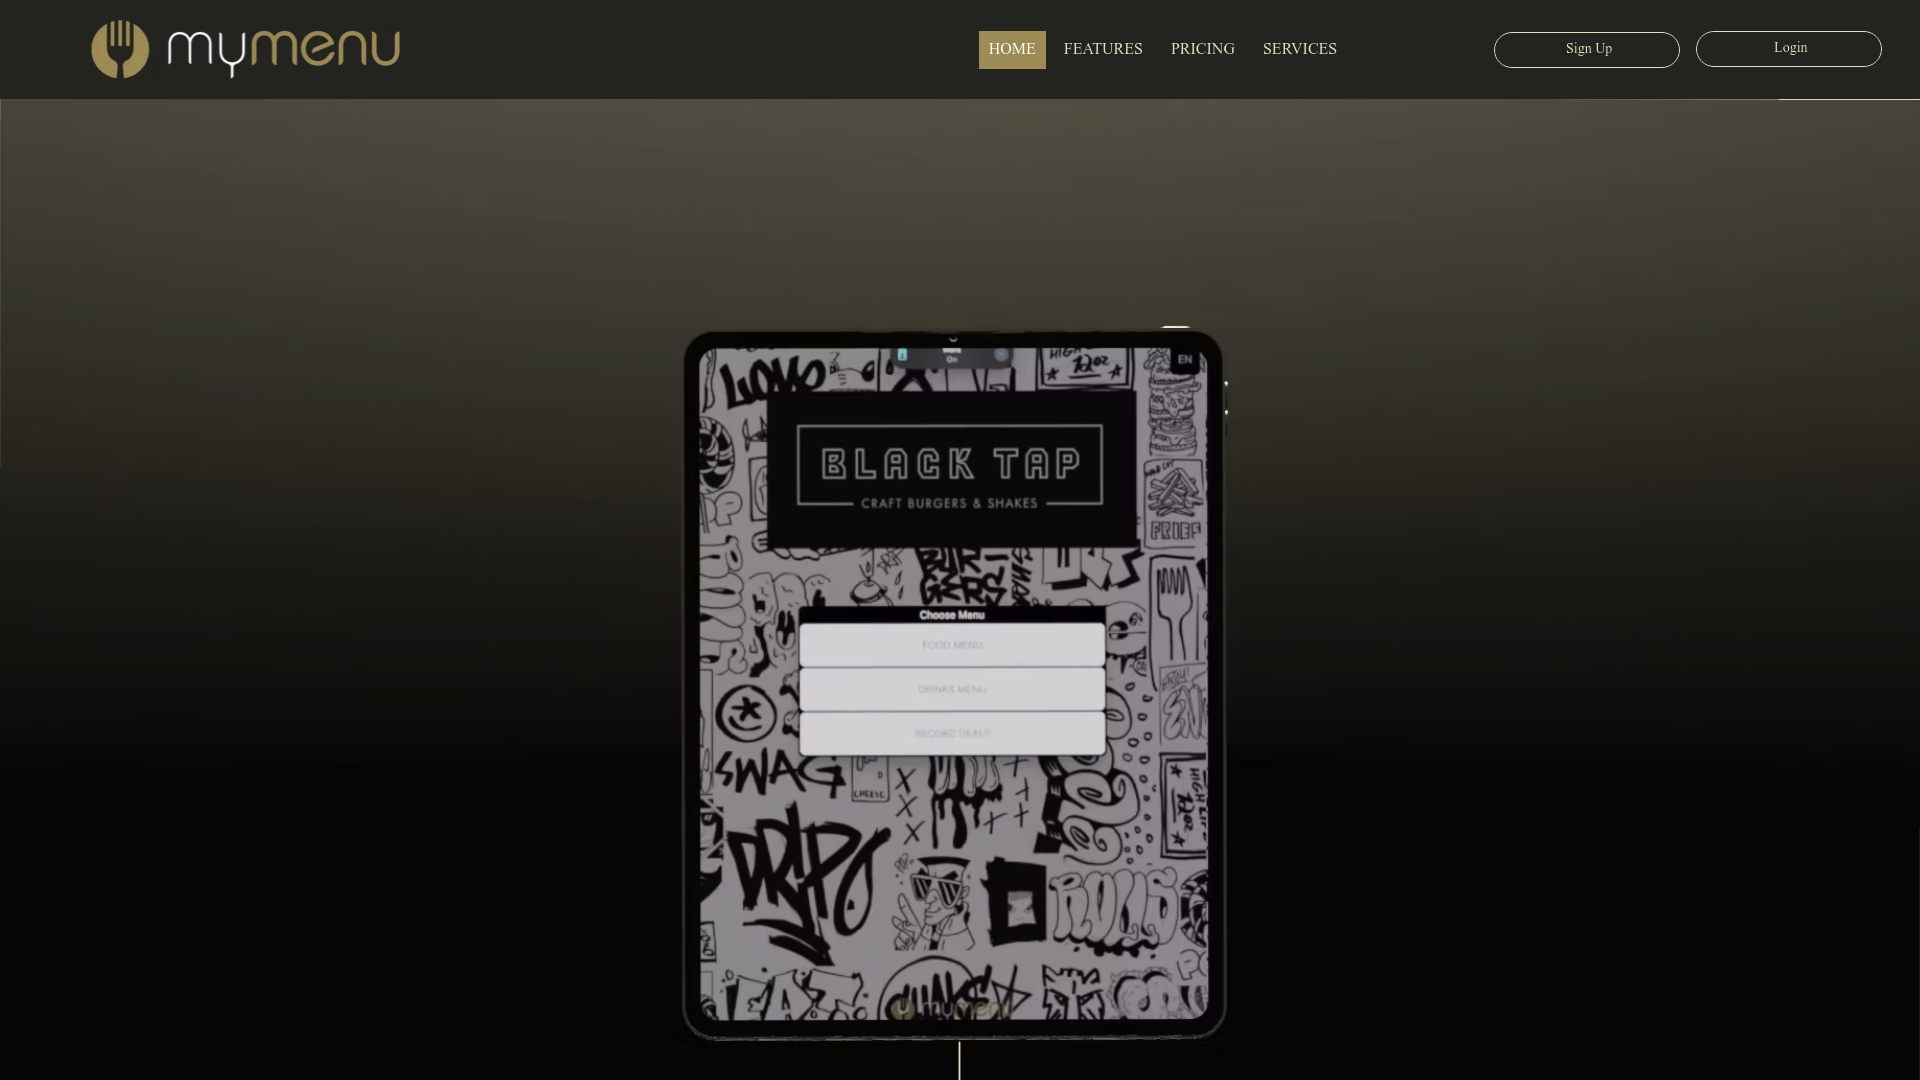
Whether you are starting your first digital menu or rebuilding an existing one, Mydigimenu’s platform supports every stage of the process described here. Visit mydigimenu.com to see how the platform fits your operation.
FAQ
What is step by step menu customization?
Step by step menu customization is the structured process of configuring a restaurant menu’s layout, item content, modifiers, and personalization features in a defined sequence. The goal is to improve guest experience and increase revenue through deliberate design and data-driven decisions.
How long does menu customization take?
Initial setup for a digital menu typically takes one to two weeks, covering content gathering, layout design, and platform configuration. Ongoing optimization is continuous, with quarterly reviews recommended as a minimum.
Does AI personalization work for small restaurants?
AI-driven menus are effective for restaurants of any size, with profitability gains of 15%–30% documented across operations that adopt dynamic digital menus. The key is maintaining a 2–4 week calibration period with active operator oversight before enabling full automation.
What are the most common menu customization mistakes?
The three most common mistakes are overloading categories with too many items, using slow-loading images on every dish rather than focusing visuals on high-margin items, and skipping regular content updates after the initial launch.
How do i measure whether my menu customization is working?
Track average check size, item click-through rates, modifier selection rates, and guest feedback scores tied to specific menu sections. These four metrics give you a clear picture of where your menu design is performing and where it needs adjustment.
Recommended
Comments